
“It is one of our articles published in Digital Arts magazines published in 2008.”
In my first article, I explained the basics of sculpting with zbrush. In addition, we talked about important tips by explaining the program interface and basic tools. Valuable comments from you made me very happy. Seeing many people trying to get to know the zbrush program, knowing that there are readers who understand that the future will be shaped by such programs made me even more excited. I haven’t been able to reply to some e-mails yet due to the intensity, but I will definitely answer them at length and enlighten them. Feel free to share your thoughts.
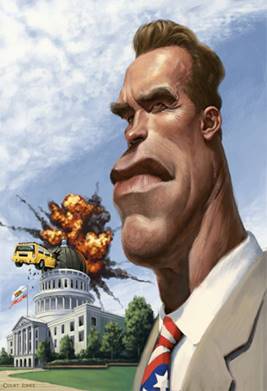
As in the previous article, I want to reinforce it with practice-oriented narration and make it better understood, instead of overly theoretical expression. For this, I will create the “Arnold Cartoon” work that I modeled for the sculpting basics article with zbrush step by step, and then explain how to paint the texture, how to adjust the materials / shaders and the rendering processes.
Creation of the base mesh

It would be best to first decide what we want to do and define the lines of our wishes exactly. Before this work, I clarified my decision and design by thinking and researching the following.
- I want to make a head model.
- I can go into details, but not a realistic head model.
- get it in cartoon style
- Make it simple, have a model I can finish
- Whether a cartoon, a well-known person, attract attention
Then I found the above cartoon of “Arnold” by searching the internet for reference images and cartoon keywords, I liked it very much and decided to work on it. But since the reference is single angle, it was certain that my model would diverge from the reference at some points. After all, it is normal that 3 dimensions and 2 dimensions show such differences.
With the 3dsmax program, I created a model on lines similar to the reference. This model is created from a model that I use as a common “base mesh”. It was enough for him to give me the outline. The UVs are ready at the same time and it is possible to change the UVs easily later.
After making the model in 3dsmax, UV’s are also seen in the picture below.


The UV of the model looks a bit problematic, but as I mentioned in my previous article, we can fix it at any time with export and import from zBrush.
Now let’s export the model we made from 3dsmax. There are some issues to be aware of here.
There should not be any modifiers on the model. In other words, we collepse the modifiers such as Unwrap, symmetry applied to the model.
While modeling, the model may be scaled with transforms and its coordinates may be distorted. For this, it is useful to do Utilities> Reset XFrorm. Then we can collepse the model again.
It should be noted that the model is in its origin without being rotate-moved, while exporting to zBrush.
I export the model with 3dsmax 2009. Our export format should be OBJ. If you are using a low max version, the OBJ Export menu may look a little different for you. But the settings are the same.

You can use any program to make and export a base model. The procedure is approximately the same. It doesn’t matter if it has software like Maya or modo.
Let’s continue with Zbrush
In the ZBrush program, we open our own document and custom UI, if available, as I explained in detail in the previous article.
We get the model by saying Tools> Import.

By creating the model on the screen with the mouse, we can also align it with the shift key. Then we press the edit button.
We can now deform the model in the viewport as we want. Having a pressure sensitive tablet will provide great convenience. It is also possible to work with the background image in zBrush, but instead of sticking to the reference image, I prefer to shape my own model by looking at the reference image from time to time. To look at the picture continuously, it will be useful to take a print out of the picture and place the paper at a comfortable angle to see or open the picture on a second monitor to quickly check the changes made.

The above brushes are the ones I use frequently. I made the model more detailed using these brushes.
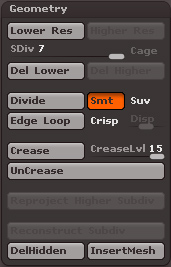
Entering details: To increase the detail of the model, you need to make Tool> Geometry> Divide (Subdivision) or you can use Ctrl + D. As can be done from the same menu, D and Shift + D shortcuts can be used to increase and decrease the detail.
I explained all the tricks and texturing techniques in the first article for texturing. I will try to explain the texture I made for Arnold in the next article. Of course if I can find time.
I hope it was useful for everyone.
